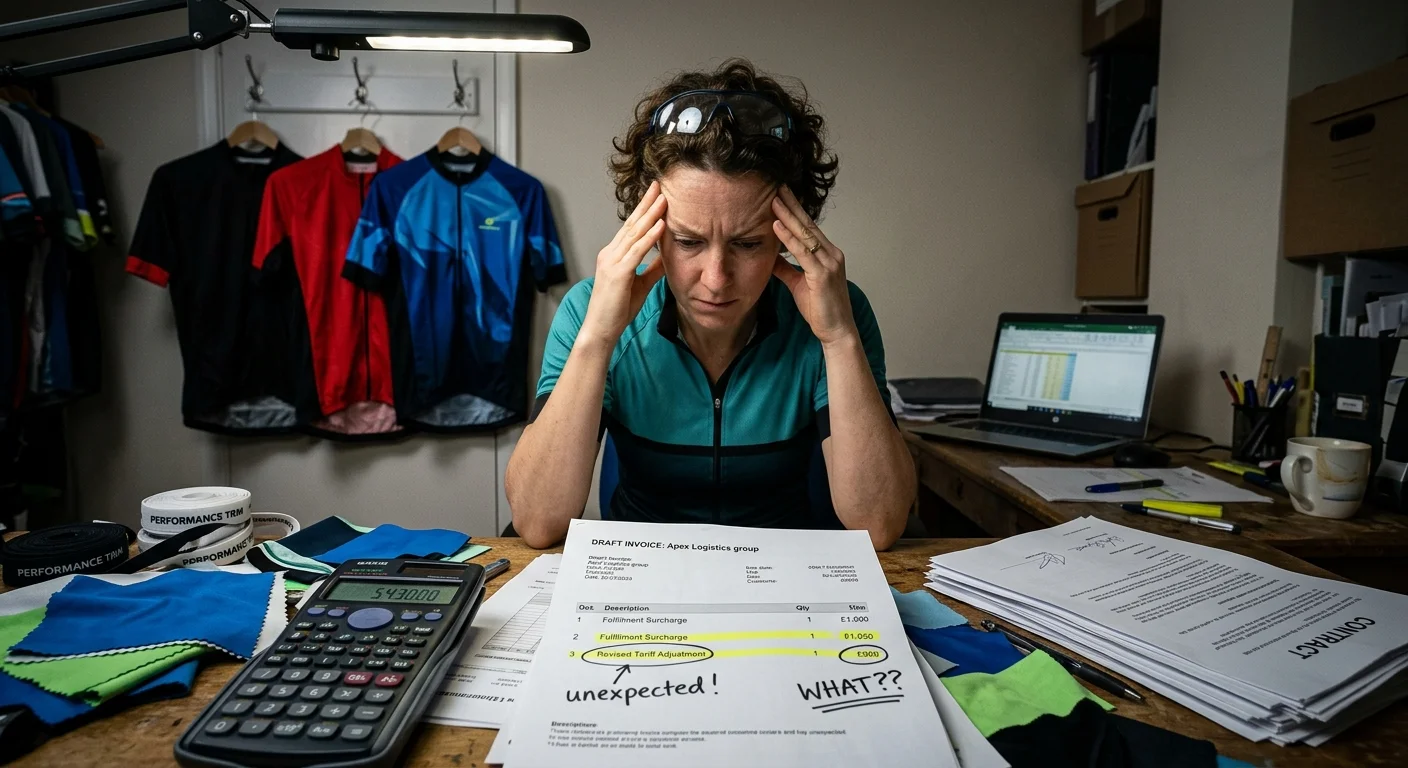
You've spent months developing your cycling kit designs. You negotiated hard on pricing. Now you've placed that bulk order with your overseas cycling apparel factory.
The production run is complete. Somewhere in a warehouse, 500 to 5,000 units are packed and waiting to ship. This is the moment most brands lose money. Not at the design stage. Not during negotiations. Right here — garments get approved without a proper cycling apparel quality control checklist before bulk order shipment . Then an entire season's inventory arrives with blown chamois stitching, faded sublimation panels, or bib shorts that run two sizes off-spec.
This guide gives you something the industry has never put together in one place. It's a 50+ point, cycling-specific pre-shipment inspection framework. It's built around real factory defects, enforceable pass/fail standards, and AQL sampling logic. You can hand it to an inspector tomorrow morning and get to work.
Pre-Inspection Preparation & Benchmark Alignment

Good documentation makes or breaks your inspection. Before any garment gets measured or tagged pass/fail, what's sitting on your inspection desk sets the tone for everything that follows.
Most quality failures in cycling apparel don't start on the sewing floor. They start with outdated tech packs, mismatched PP samples, or no clear definition of what "acceptable" means for this order.
Here's what to lock down before inspection begins:
Lock Your Benchmark Documents First
Set up a version-controlled spec pack at the inspection station. It must include:
Latest signed tech pack (style code, revision number, date)
Approved BOM with cycling apparel supplier codes for every material
Signed PP sample measurement sheet + POM diagram
Approved color standards — lab dips, shade bands, sublimation print strike-offs
Cross-check every cycling apprel factory working file against this master list. Stamp any old version "OBSOLETE" and pull it from the production floor right away. Don't leave outdated files where inspectors can grab them by mistake.
Build Your Golden Sample Station
Set up a dedicated golden sample station at the inspection area entrance. Place your sealed PP samples, trim cards, POM diagrams, and measurement tolerance sheets together in one visible spot.
Every inspector checks the first piece from each line against this station. No exceptions. No shortcuts.
Set Measurement Tolerances Before You Start
For cycling kits, sign off tolerances per size set before bulk production moves forward:
Chest / body panel width : ±1.0 cm
Body length from HPS : ±1.0–1.5 cm
Waist (bib shorts, relaxed) : ±1.0 cm
Flag any deviation beyond these numbers early. You don't want to discover a problem after 3,000 units are already cut.
AQL Sampling Framework & Defect Classification Setup
Here's the truth about bulk order inspections: checking every single unit isn't just impractical — the numbers don't support it either. What you need is a sampling framework that gives you defensible, actionable data. ISO 2859-1 / ANSI ASQ Z1.4 General Inspection Level II is built for this.
Step 1: Determine Your Sample Size
Your lot size dictates everything. Use this default rule:
Lot Size | Code Letter | Sample Size |
|---|---|---|
501–1,200 units | J | 80 pcs |
1,201–3,200 units | K | 125 pcs |
3,201–10,000 units | L | 200 pcs |
Real-world example: You ordered 2,000 cycling jerseys. That falls under Code K — you inspect 125 pieces. Not 2,000. Not gut feel. Pull 125 units at random across cartons.
On carton selection: say those 2,000 units are packed 100 per carton — that's 20 cartons total. Open 13 cartons at random. Pull units from the top, middle, and bottom of each one. Never let the cycling clothing factory choose which cartons you open.
Step 2: Set Your AQL Levels — Non-Negotiable Numbers
For cycling apparel, lock in this three-tier AQL structure before inspection begins:
Critical defects → AQL 0.0 (zero tolerance)
Major defects → AQL 2.5
Minor defects → AQL 4.0
Accept/Reject matrix for n=125 pcs (Code K):
Defect Class | AQL | Accept (Ac) | Reject (Re) |
|---|---|---|---|
Critical | 0.0 | 0 | 1 or more |
Major | 2.5 | 7 | 8 or more |
Minor | 4.0 | 10 | 11 or more |
For larger lots at n=200 pcs (Code L): Major Ac=10/Re=11; Minor Ac=14/Re=15.
Step 3: Define Your Defect Dictionary
Ambiguity kills inspections. Pre-classify every defect before your inspector walks into that warehouse. Below is the cycling-specific severity matrix:
🔴 Critical (AQL 0.0 — Reject on the spot, halt inspection)
- Broken needle or metal fragment inside seam
- Missing mandatory fiber content or care label (a legal requirement in most markets)
- Chemical non-compliance (banned azo dyes, formaldehyde over legal threshold)
- Drawcord or toggle on children's cycling wear that violates safety standards
🟠 Major (AQL 2.5 — Affects function, fit, or saleability)
- Zipper failure on cycling jersey — won't close or opens under tension
- Seam separation on chamois panel under standard pull test
- Size measurement out of tolerance (chest width deviation >±1.5 cm)
- Visible panel shading — different sublimation tones on the same garment, detectable at 1 meter
- Chamois pad misaligned or delaminating at pad-to-fabric bond
🟡 Minor (AQL 4.0 — Cosmetic, doesn't affect wearability)
- Loose thread under 2 cm, no seam opening
- Sublimation print misalignment within 2 mm on non-logo panels
- Small silicone gripper edge lift on non-stress zone
- Label placement slightly off-center, still legible
Step 4: Apply Decision Rules — No Gray Areas
Once inspection is complete, the decision logic is binary:
Any Critical defect found → Reject the entire lot. No negotiation. No partial shipment.
Major count exceeds Ac → Reject lot. Require 100% rework + full re-inspection at the same AQL before any release.
Major within Ac, Minor exceeds Ac → Reject lot.
Both Major and Minor within Ac → Accept lot.
Also worth building into your SOP: tightened inspection triggers . A cycling apparel factory that fails two consecutive lots moves to tightened inspection — larger sample size, stricter Ac/Re thresholds. Give them a clear path back to normal inspection after five consecutive passing lots.
This framework isn't theory. Drop these exact numbers into your PO terms. Send them to your third-party inspection company as a standing brief. Your cycling apparel quality control checklist before bulk order shipment should include pre-defined Ac/Re numbers, defect dictionaries, and carton selection protocols. Do that, and you've cut out the single biggest variable in pre-shipment inspection: subjective judgment.
Fabric Physical & Functional Testing
Fabric is where performance promises either get kept or fall apart.
A jersey can look perfect on a hanger. At kilometer 80, it fails the rider — wrong GSM, broken elastic recovery, moisture that clings instead of wicks. These aren't aesthetic problems. They're functional failures. Returns, chargebacks, and damaging social media reviews follow. That damage sticks to a brand for years.
Here's what to test, how to test it, and what the numbers need to look like before you release a single carton.
1. Fibre Composition & GSM Verification
Start with what the fabric is — not what the mill told you it is.
Fibre Composition Testing
Use an FTIR spectrometer or NIR device to verify the blend against your approved spec. For performance cycling fabric, a tolerance of ±3–5% absolute per major fibre component is industry-standard.
What that looks like in practice:
Spec: 80% polyester / 20% elastane
Acceptable range: 77–83% polyester / 17–23% elastane
Find the wrong base fibre — say the mill swapped nylon for polyester, or the elastane content shifted enough to change the label claim — and you have a Critical defect . Stop. Do not pass that lot.
GSM (Fabric Weight) Testing
Standard: ISO 3801 or ASTM D3776 Option C
Method: Cut a 100 cm² template from the fabric. Weigh it on a 0.01g precision scale . Convert to g/m². Pull ≥5 specimens across the fabric width and average the results.
Result vs. Approved Spec | Classification |
|---|---|
Within ±5% | ✅ Pass |
5–8% deviation | 🟡 Minor |
>8% deviation | 🟠 Major |
Real-world example: Your jersey fabric is specced at 220 gsm .
Accept range: 209–231 gsm (±5%)
Flag as Major: anything below 202 gsm or above 238 gsm
A fabric running under spec weight loses shape under saddle pressure. Over spec, you're selling a kit that rides heavy and hot. Neither is what your customer paid for.
2. Moisture Wicking Performance
Most brands skip this test. It's also one of the first things a serious cyclist notices on the bike.
Relevant standards : AATCC 79 (drop absorbency), AATCC 197 / ISO 18695 (vertical wicking), AATCC 195 (full moisture management properties)
Field-Executable Drop Test (No Lab Required)
Mount the fabric flat, face side up. Apply 0.1 mL of deionized water from a fixed height of 10 mm. Start a timer the moment the drop lands.
✅ Pass : Full absorption in ≤3 seconds — no visible bead remaining
🟠 Major defect : Absorption time >3 seconds
Horizontal Diffusion Test
Place the specimen on a non-absorbent surface. Apply the same droplet. At the 5-second mark, measure the radius of the wetting front.
✅ Pass : Wetting radius ≥5 cm (a 10 cm diameter spread)
🟠 Major defect : Radius <5 cm at the 5-second mark
Both criteria must pass together. Fail either one, and the entire fabric lot becomes a Major. Require re-testing from a different production roll.
With AATCC 195 equipment , add these benchmarks:
Top wetting time: ≤3 s
Bottom wetting time: ≤5 s
Spreading speed (face side): ≥2 mm/s in first 20 seconds
One-way transport index: >100 (excellent moisture management)
Test ≥3 specimens per shade lot. Use both warp and weft orientations if the fabric surface has a directional treatment.
3. Stretch & Elastic Recovery
A cycling bib short that doesn't recover bags out mid-ride. Elastic recovery is non-negotiable in this category. Yet factories almost never test it unless you put it in writing as a requirement.
Applicable standards : ASTM D2594, ASTM D3107, ISO 20932-1
Test Protocol (Field-Adaptable)
Cut specimens 50 mm × 200 mm in both warp and weft directions
Mark a 100 mm gauge length (L₀) on each specimen
Load into a CRE tensile machine; stretch to 150% of L₀ (i.e., to 150 mm)
Hold at 150% for 10 seconds
Release; allow 1–2 minutes recovery at standard atmosphere (20–23°C, 50–65% RH)
Measure recovered gauge length (L₂)
Calculate Permanent Deformation:
Permanent Deformation (%) = [(L₂ − L₀) / L₀] × 100
Result | Classification |
|---|---|
Permanent deformation ≤5% (L₂ ≤ 105 mm) | ✅ Pass |
Permanent deformation >5% , garment still wearable | 🟠 Major |
Seam burst, fabric rupture, or elastic yarn break during test | 🔴 Critical |
For cycling shorts: run 5–20 repeat cycles at 150% strain to simulate real use. Cumulative permanent growth after the final cycle must still read ≤5–7%. Test ≥5 specimens per direction.
4. Pilling Resistance
Saddle contact zones, inner thigh panels, jersey sleeve edges — these are high-abrasion areas. Poor-quality fabric pills fast in all three spots. A grade 2 pilling result after 5,000 cycles means you're shipping a kit that looks worn after three rides.
Standards : ISO 12945-2 (Martindale method), ASTM D3512 (random tumble pilling box)
Martindale Test Parameters for Cycling Knits
Load: 415 g (standard for knits per ISO 12947/12945)
Mount face side, with polyurethane foam backing
Evaluate at: 1,000 / 2,000 / 5,000 cycles (minimum)
Grade against standard photographs: 1 (severe pilling) → 5 (no change)
Martindale Result at 5,000 Cycles | Classification |
|---|---|
Grade ≥4 | ✅ Pass |
Grade 3 to <4 | 🟠 Major |
Grade <3 | 🟠 Major / Borderline Critical |
Premium cycling brands set grade ≥4 at 2,000 cycles as a baseline screen. It's a useful checkpoint before you commit to the full 5,000-cycle run. Test 3–5 specimens per shade .
5. Dimensional Stability (Wash Shrinkage)
Standards : ISO 6330, AATCC 135 / AATCC 150
A cycling jersey that shrinks 5% in the torso after two washes becomes a size smaller. That's a refund conversation, not a fit conversation.
Protocol
Mark fabric or finished garment with 250 mm gauge lengths in both length and width directions
Launder per care label: 40°C, gentle cycle, standard detergent, line dry or low tumble
Measure post-wash gauge lengths
Run a minimum of 3 wash cycles before final evaluation
Shrinkage Calculation:
Shrinkage (%) = [(L₀ − L₁) / L₀] × 100
Positive = shrinkage; Negative = growth — both are a problem in stretch fabrics
Result | Classification |
|---|---|
Length and width change ≤3% in either direction | ✅ Pass |
Either dimension exceeds 3% shrinkage or growth | 🟠 Major |
Test 3 garment samples per size run , or 3 fabric swatches per color lot . For high-stretch performance knits, ≤3% after 3 cycles is a target any solid factory can hit with proper compacting. Can't hit it? That's a process problem — not a tolerance negotiation.
Fabric Testing Summary Matrix
Test | Standard | Pass Threshold | Major Defect Trigger | Critical Trigger |
|---|---|---|---|---|
Fibre Composition | FTIR / NIR | ±3–5% per component | — | Wrong base fibre or label-altering deviation |
GSM | ISO 3801 / ASTM D3776 | ±5% of spec | >8% deviation | — |
Moisture Wicking (drop) | AATCC 79 | ≤3 s absorption | >3 s | — |
Moisture Wicking (spread) | AATCC 197 | ≥5 cm radius @ 5 s | <5 cm radius | — |
Elastic Recovery | ASTM D2594 / ISO 20932-1 | ≤5% permanent deformation | >5% deformation | Fabric rupture / yarn break |
Pilling | ISO 12945-2 | ≥ Grade 4 @ 5,000 cycles | Grade 3–<4 | Grade <3 |
Wash Shrinkage | ISO 6330 / AATCC 135 | ≤3% per direction | >3% shrinkage or growth | — |
Every threshold in this table goes into your fabric tech pack and cycling wear supplier QA manual as a hard go/no-go criterion. Send it to your mill before bulk cutting begins — not after production is done. That one step cuts out the most common source of fabric-level failures in cycling kit fabric inspection programs.
Sublimation Print & Colorfastness Verification
Sublimation failures are invisible at the factory — and catastrophic at the customer's door.
A jersey that fades after three rides, bleeds color onto a white bibs waistband, or shows ghosting lines across a sponsor panel doesn't just generate returns. It kills reorder conversations before they start. This section of your cycling apparel quality control checklist before bulk order shipment separates brands that earn repeat business from brands that vanish after season one.
Here's how to inspect it.
Visual Print Defects — Check These First
Start with your eyes before any instrument touches the garment. Align each piece against the approved artwork template grid. You're hunting for three specific killers:
Ghosting — a faint duplicate shadow offset from the main print. Paper or fabric moved during heat transfer.
White streaks — uneven dye penetration. Usually caused by inconsistent press pressure or a temperature drop across the platen.
Color blocking misalignment — brutal on curved panels and seam junctions. Stretch distorts registration in those areas.
Panel alignment tolerance: ±0.5 cm on logo placement, scale deviation ≤1%. Visible misalignment beyond 0.8 cm — on sponsor graphics or color-block seam lines — is a Major defect . Reject those units.
Focus first on edges, seams, and curved panels . Heat, stitch tension, and stretch all push sublimation migration hard at those stress zones. Flat center-front panels look clean. Armhole seams show the real picture.
Colorfastness Testing — The Full Battery
Don't run one test and call it done. Cycling kit fabric takes hits from sweat, sunlight, friction, and repeated washing — all at once. Your sublimation print quality check for cycling needs to cover all four attack vectors.
Run these five tests on every new color lot:
Test | Method | Pass Threshold | Defect Level if Failed |
|---|---|---|---|
Wash Fastness | ISO 105-C06 / home wash (cold, standard detergent) | ≥ Grade 4, no bleeding | 🟠 Major |
Dry Rubbing | ISO 105-X12 | ≥ Grade 4 on grey scale | 🟠 Major |
Wet Rubbing | ISO 105-X12 | ≥ Grade 4 on grey scale | 🟠 Major |
Perspiration Fastness | ISO 105-E04 | ≥ Grade 4 (color change + staining) | 🟠 Major |
Lightfastness | UV lamp exposure, 24 hours with dark control swatch | ≥ Grade 4 vs. control | 🟠 Major |
Use 10 cm × 10 cm print swatches for wash and UV tests. Compare each against a reference swatch under identical lighting — before and after every test. Subtle color shift won't show up without that side-by-side.
One extra test most brands skip: sublimation heat/scorch fastness. Press a sample at 150–180°C for 30 seconds (per AATCC 117/133 guidance). Condition it. Then rate shade change and staining transfer against an adjacent white fabric. Cycling jerseys sit stacked in warm shipping containers. Dye migration under heat is a real production failure — not a theoretical one.
Spectrophotometer Color Measurement
Grey-scale grading is your first filter. Spectrophotometer measurement confirms it.
Target: ΔE < 1.5 between the production sample and the approved color standard.
ΔE < 1.0: Excellent match — no visible difference to the human eye
ΔE 1.0–1.5: Acceptable — marginal perceptible difference under critical light
ΔE > 1.5: Major defect — visible color shift, require re-strike from factory
ΔE > 3.0: Panel shading visible at arm's length — borders on Critical for color-blocked designs
Flag ΔE > 1.0 as a color shift Major defect on finished garments heading to retail. For team kit orders where multiple units must match on the start line, tighten that standard to ΔE < 0.8 per panel.
Flex Test for Print Durability
Static color is half the story. Sublimation print that looks perfect flat can crack at the first bend.
Protocol: Flex each printed panel 20 times at a tight bend radius across the print zone. Inspect under good light at 45 degrees.
Cracking visible after 20 flex cycles → 🟠 Major defect
Cracking visible after fewer than 10 cycles → 🔴 Critical defect
Trademark & Artwork Compliance — Zero Tolerance
One defect classification here overrides everything else.
Any garment carrying unauthorized logo use or trademark-infringing artwork is a 🔴 Critical defect — immediate lot rejection, full stop. This isn't a quality judgment. It's a legal exposure issue. Build it into your defect dictionary as a non-negotiable hard stop.
Sampling Cadence
Check colorfastness on every new ink batch and at minimum quarterly on ongoing production runs. Pull samples from edges and seam zones — not just from the clean center-front panel where the factory knows you're looking.
Chamois Pad Quality & Positioning
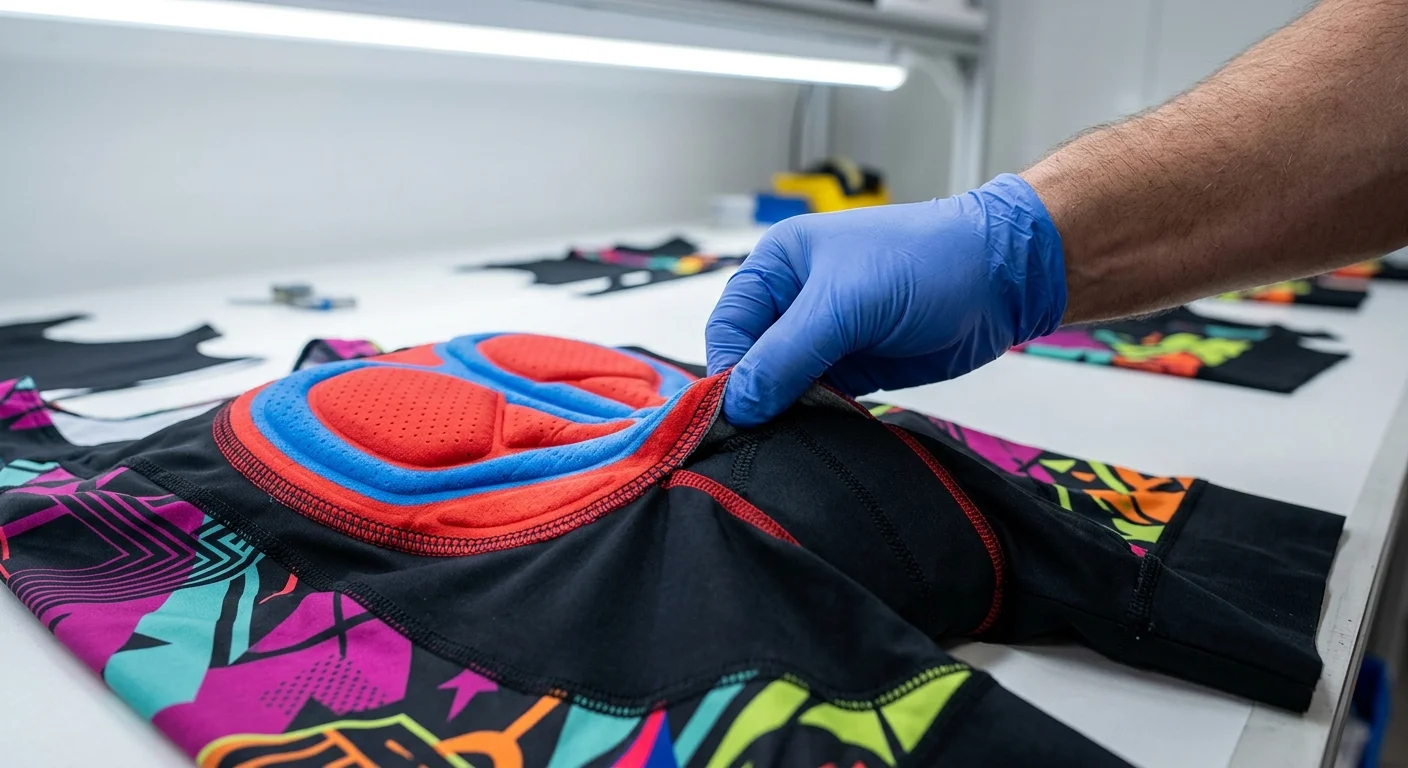
The chamois pad is the single most performance-critical component in a cycling bib short. It's also the easiest component for a factory to get wrong — and the mistakes are never cheap.
Wrong density. Wrong gender cut. Wrong discipline. Misaligned by 12 mm to the left. Delaminating at the sit-bone zone after three washes. None of these failures show up on a visual hanger check. Every one of them generates a return, a chargeback, or a one-star review that stays on the internet forever.
Here's how to inspect it, step by step.
Step 1: Verify Pad Identity Against Your BOM
Before you touch the foam, confirm you have the right pad.
Flip the short inside out. Check the pad back side for the printed or heat-transfer label. You're looking for the brand name, model code, size, and gender designation. Then cross-reference against your approved BOM. Activewear suppliers like Elastic Interface , La Fonte , and Dolomiti each use distinct shape profiles, colorways, and printed branding per model. A mismatch here isn't a paperwork issue — it's a 🔴 Critical defect . Stop the inspection.
Check gender-specific geometry:
Men's pads : narrower front, deeper central relief channel
Women's pads : wider ischial zone (110–150 mm benchmark), shorter front nose
Check discipline alignment:
Discipline | High-Protection Zone | Common Thickness Range |
|---|---|---|
Road | Perineal / front | 6–9 mm (training), 3–5 mm (race) |
MTB / Gravel | Sit bones / rear | 10–14+ mm (endurance) |
Triathlon | Perineal, minimal bulk | 3–5 mm |
Wrong discipline pad in the wrong garment = 🔴 Critical. An MTB pad in a road race bib short puts every high-density zone in the wrong place relative to rider contact points.
Step 2: Foam Density & Thickness Mapping
Premium pads use two to four foam densities in a single pad. The denser zones sit under the sit bones and perineum. The softer interface foam goes against the body.
Manual squeeze test: Press three fingers into different pad zones with firm pressure. More resistance means higher density and more protection. Check that the high-resistance zones land where your pad map specifies — under the ischial tuberosities and perineal channel.
Mis-located dense zone → 🟠 Major
Wrong density spec vs. tech pack → 🔴 Critical
Digital caliper thickness mapping: Measure total pad thickness (fabric plus foam) at:
Left and right sit-bone zones
Perineal channel and front support area
Transition zones and side wings
Measurement Check | Pass Threshold | Defect Level |
|---|---|---|
vs. spec at sit-bone zone | ±1.5 mm | 🟠 Major if exceeded |
Left vs. right symmetry (same point) | ≤1.0 mm difference | 🟠 Major if >1.5 mm |
Adjacent point-to-point variation | ≤2 mm jump | Potential hard spot — investigate |
Local thickness at high-pressure point | ≥60–70% of spec | 🔴 Critical if below |
Map every 10–15 mm along the full saddle contact line. A sudden 3 mm drop between adjacent measurement points signals a hollow or compression defect. Don't pass it — investigate first.
Hard spot and delamination check: Run your thumb across the entire pad surface with firm, steady pressure. Any sharp transition, stiff zone, or area that "clicks" on flex points to delamination or an air pocket between foam layers.
In sit-bone or perineal zones → 🔴 Critical
In low-pressure side wings → 🟠 Major if detectable under seated pressure
Step 3: Surface Fabric & Edge Construction
The pad cover fabric sits against rider skin for hours at a stretch. It needs to stretch without wrinkling, manage moisture without saturating, and stay antibacterial without breaking down.
What to confirm:
Fabric handfeel: elastic, not spongy — soft surface with firm support underneath
Stretch: ≥20–30% in both warp and weft — low stretch creates bunching under saddle load
Antibacterial treatment: verify per cyclinf apparel manufacturer spec; no visible coating peel or surface breakdown
Edge construction inspection:
High-end pads use laser-cut or heat-bonded edges. Run a fingernail around the full perimeter.
Edge Defect | Classification |
|---|---|
Exposed threads anywhere on pad perimeter | 🟠 Major |
Frayed fabric or broken bond at curved tips | 🟠 Major |
Exposed adhesive bleed through surface or holes | 🔴 Critical |
Edge thickness variance >±0.5 mm (lumps at seam transitions) | 🟠 Major |
For pads with ventilation perforations: each hole must be punched clean — no hanging yarn, no torn edges. Blocked or misaligned perforation clusters cut breathability. Classify as Minor to Major based on how much of the surface area is affected.
Step 4: Placement, Symmetry & Anchoring
A perfect pad inserted 8 mm off-center is a defective garment. Bad placement causes uneven pressure loading. The rider feels it at kilometer 60 and can't figure out why.
Centerline alignment:
The pad centerline must align to the garment's CF/CB grain line with zero rotation tolerance . Any rotation beyond 5° is a 🟠 Major defect .
Left/right symmetry check:
Fold the short along the center front-to-back axis. The left and right pad wings should overlap with a clean match.
≤3–4 mm offset → ✅ Pass
>5 mm offset → 🟠 Major
>10 mm offset → 🔴 Critical (unilateral pressure loading)
Mock wear and shift test:
Place the shorts on a fit model or mannequin in an aggressive riding posture. Run through 10–15 pedaling cycles — full hip and knee flexion and extension. Mark the pad center position at the start. Check displacement after cycling.
Result | Classification |
|---|---|
Pad shift ≤0.8 cm in any direction | ✅ Pass |
Pad shift >0.8 cm | 🟠 Major — stitching/anchoring failure |
Persistent wrinkling or tenting in saddle contact zone | 🟠 Major — chafing risk |
Step 5: Stitching, Seam Placement & Adhesive Integrity
Stitch specifications:
Type: flatlock or zigzag (stretch-compatible)
Density: 3–5 stitches/cm along full pad perimeter
Width consistency: ±1 mm — no narrowing at curved sections
Zero broken, skipped, or loose stitches anywhere on the perimeter
Seam placement rule: No seam should run under the sit-bone zone or through the perineal channel. Seams in high-pressure areas build hard ridges. Those ridges translate straight into saddle sores. For designs using a floating chamois (partial-perimeter stitching), check that all bar-tack anchor points are tight and secure. The central float zone must not allow more than 0.8 cm of pad movement under load.
Adhesive and lamination check:
Blistered, cloudy, or separated lamination on pad flex → 🟠 Major to 🔴 Critical depending on zone and size
Exposed adhesive at any edge or surface point → 🔴 Critical — it's sharp, skin-reactive, and breaks down fast with sweat contact
Chamois Pad Inspection Summary
Check | Pass Standard | Defect Level |
|---|---|---|
Pad ID vs. BOM (brand / model / gender / discipline) | Exact match | 🔴 Critical if wrong |
Sit-bone thickness vs. spec | ±1.5 mm | 🟠 Major if exceeded |
Left/right thickness symmetry | ≤1.0 mm difference | 🟠 Major if >1.5 mm |
High-density zone placement | Per pad map | 🔴 Critical if mislocated |
Hard spots or delamination (pressure zones) | None | 🔴 Critical |
Surface stretch | ≥20–30% warp and weft | 🟠 Major |
Edge threads or adhesive bleed | Zero | 🔴 Critical (adhesive) / 🟠 Major (threads) |
Centerline rotation | ≤5° | 🟠 Major if exceeded |
Left/right offset (fold test) | ≤4 mm | 🟠 Major >5 mm / 🔴 Critical >10 mm |
Mock-wear pad shift | ≤0.8 cm | 🟠 Major if exceeded |
Wrinkling in contact zone (riding posture) | None | 🟠 Major |
Stitch density | 3–5 stitches/cm | 🟠 Major if outside range |
Seam location (pressure zones) | No seam under sit bones / perineum | 🟠 Major |
Lamination integrity | No separation when bent | 🟠–🔴 Critical by zone |
Seam Construction & Burst Strength Testing
Blown seams don't fail at the factory. They fail at kilometer 90, when a rider stands out of the saddle and drives full load through the crotch gusset.
Seam failure is the most preventable quality disaster in cycling apparel — and the most skipped test category in pre-shipment inspection. Here's how to close that gap.
The Two Tests That Cover Cycling Kit Construction
Cycling kits mix woven components (bib straps, waistbands, gripper anchors) with high-stretch knit panels (jersey body, shorts body). Each material type needs a different test method.
ASTM D1683 — seam tensile strength for woven panels and reinforced joins
ASTM D3787 — ball burst test for knit panels and stretch seam zones
Run both. One test alone won't cover your full garment construction.
Minimum Acceptance Values by Zone
Seam / Panel Zone | Test Method | Minimum Pass Value | Defect Level if Failed |
|---|---|---|---|
Woven panels (bib strap anchors, gripper joins) | ASTM D1683 | ≥70 N | 🟠 Major |
Knit body panels & seams (jersey, shorts) | ASTM D3787 | ≥100 N | 🟠 Major |
Load-bearing joins (bib strap to back yoke) | ASTM D1683 | ≥150 N | 🔴 Critical if <100 N |
High-stretch activewear seams (general) | ASTM D4033 / ISO 13935-2 | ≥120 N target | 🟠 Major if <80 N |
For the D1683 tensile test: center the seam between grips at a 75 mm gauge length . Pull at 300 mm/min and record peak load in Newtons. Test a minimum of two specimens per seam location and report the average.
For the D3787 burst test: use a 50 mm round specimen mounted over the ball fixture. Critical zones — crotch gusset, underarm, chamois perimeter seam — all need ≥100 N burst strength.
One non-negotiable rule: the fabric must fail before the seam under maximum load. Seam thread breaking before the base fabric tears means seam efficiency is below 100%. That's a construction failure — even if the peak load number passes on paper.
Priority Seam Locations to Test
Don't test at random. Pull specimens from the highest-stress zones first:
Crotch gusset joins — peak load in sprinting and climbing
Bib strap-to-back-yoke junction — sustained tension over 3–5 hour rides
Armhole and underarm seams — multidirectional stress on every pedal stroke
Side seams and shoulder seams — standard test locations per D1683
Request both pre-wash and post-wash seam test reports from the factory lab. A seam that passes at 120 N fresh but drops to 75 N after three washes is a return request waiting to happen.
On-Site Manual Checks (No Lab Required)
Lab reports confirm numbers. Manual checks catch what lab reports miss — seams with weak anchor points, skipped stitches, and construction shortcuts that show up under real-body movement.
Run these checks on every unit in your AQL sample:
Pull test: Grip both sides of the seam and apply steady perpendicular tension. Listen and feel. Any audible pop, visible thread rupture, or seam opening wider than 2 mm is an immediate 🟠 Major defect .
Twist/stretch test: Target crotch, underarm, and shoulder seams. Stretch the garment along the seam axis to simulate dynamic riding posture. The seam should hold without gaping. Opening under moderate manual stretch → 🟠 Major .
Pinch tear test: Pinch the seam and try to start a tear perpendicular to the stitch line. This works well for lightweight performance knits where puckering can hide weak construction.
Visual Workmanship Standards
Every seam in your AQL sample gets a visual check against these pass/fail criteria:
Visual Check | Pass | Defect Level |
|---|---|---|
Stitch length consistency | Equal length, no variation | 🟡 Minor if uneven but intact |
Skipped stitches | Zero | 🟠 Major |
Seam puckering or distortion | None under flat inspection | 🟠 Major if severe |
Loose or hanging threads | Zero broken threads at seam | 🟡 Minor (<2 cm) / 🟠 Major if at stress point |
Bar tacks at stress points | Present and tight per spec | 🟠 Major if missing |
Seam slippage (fabric yarns sliding from stitch line) | None visible | 🔴 Critical at load-bearing zones |
After wash testing, re-inspect seams for puckering and shrinkage distortion . A clean pre-wash seam that puckers after 3 cycles points to thread shrinkage differential. That's a construction problem — not a finishing flaw.
What to Specify in Your Tech Pack
Lock these exact requirements in writing before bulk cutting begins:
"Seam strength (woven panels): ASTM D1683 ≥ 70 N at bib strap anchor joins and side seams."
"Bursting strength (knit body panels and seams): ASTM D3787 ≥ 100 N at crotch gusset and underarm zones."
"Lab reports must include: maximum force at failure, failure mode (thread break / fabric tear / seam slippage), and post-wash re-test results."
Require the factory to report failure mode — not just peak load. A seam that breaks at 105 N via seam slippage is a construction failure. A seam that breaks at 105 N because the fabric tore first is a pass. The number is the same. The construction quality is not.
Functional Hardware & Zipper Durability
A cycling jersey zipper that fails mid-ride isn't a minor inconvenience. It's a brand reputation problem — and it happens more often than factories will admit.
Zipper hardware takes more stress than any other component on a cycling jersey. Every pull, every lateral stretch across the chest, every extreme temperature swing inside a shipping container puts load on those coils. Yet most pre-shipment inspections spend thirty seconds on zippers. Here's what a real check looks like.
Brand & Component Verification — Check Before Anything Else
Pull the slider off and read the back. Your tech pack specifies YKK #5 coil ? That's what should be on every single unit. Check:
Brand marking : YKK logo or code on slider body
Size code (#3/#5) stamped on slider back
Coil and teeth shape must match your approved counter-sample
Generic coil swapped in for contracted YKK = 🔴 Critical defect . Reject the batch.
Also verify zipper type and size against your BOM:
Jersey Zone | Recommended Zipper | Min Size |
|---|---|---|
Center front | YKK coil or vislon | #5 |
Rear pockets | YKK coil | #3 |
Underarm vents | YKK coil | #3 |
Sliding Force Test — The 30-Second Field Check
Attach a force gauge to the slider pull . Move the slider at a steady, constant speed — full open to full close. Record peak sliding force in both directions.
Result | Classification |
|---|---|
3–8 N (smooth operation) | ✅ Pass |
>8 N (stiff, jam risk) | 🟠 Major |
<3 N (no lock feel) | 🟠 Major |
Slider jams or skips teeth | 🔴 Critical |
Mechanical Strength Tests — ASTM D2061 Framework
ASTM D2061 is the governing standard. It covers every failure mode that matters for cycling apparel: chain element strength, stop holding strength, slider pull-off resistance, auto-lock holding force, and torsional resistance.
Minimum acceptance benchmarks by zipper size:
Test | #3 Coil | #5 Coil | Defect Level if Failed |
|---|---|---|---|
Chain/element tensile strength | ≥150 N | ≥300 N | 🟠 Major |
Top/bottom stop holding strength | ≥70 N | ≥100 N | 🟠 Major |
Slider pull-off resistance | ≥70 N | ≥120 N | 🟠 Major |
Auto-lock slider holding force | 15–20 N (no creep) | 15–20 N | 🟠 Major |
Bottom stop separation under donning load | No separation | No separation | 🔴 Critical |
For auto-lock verification : place the slider in locked position with the pull tab flat. Add a gradual axial load from 0 to 30 N along the chain. The slider must not move below your threshold — 15–20 N for jerseys is the standard target. Above that threshold, it must release with a clean, deliberate action.
Cycle Durability Test
Run a reciprocating fatigue tester at a minimum of 500 open/close cycles as your production validation benchmark. At every 50-cycle interval, add a 15–20 N lateral load on the tape. This simulates chest expansion under hard effort.
Track these signs throughout the test:
- Increasing sliding resistance (force sensor trending up)
- Coil spreading or tooth disengagement
- Audible abnormalities — clicking, grinding
- Puller fatigue or micro-cracking at the attachment point
Post-test, do a full visual inspection. Look for broken teeth, slider looseness, coil deformation, tape distortion, and seam failure at the tape attachment point.
Cycle Threshold | Failure Mode Observed | Classification |
|---|---|---|
Failure before 50 cycles | Any jam or separation | 🔴 Critical |
Failure at 50–500 cycles | Coil spread, tooth skip | 🟠 Major |
500+ cycles, passes all checks | ✅ Pass |
Bottom Stop Alignment & Dimensional Tolerances
A misaligned bottom stop creates uneven chain closure. On a center-front jersey zip, you'll see it right away — the hem puckers and the chain gaps under tension.
Tape flush with fabric edge : ±1 mm tolerance on both sides at the hem
Bottom stop position deviation: ≤1 mm from spec location
Zipper length vs. spec: within ±1% of nominal — solid production runs hold this tight
Straightness check: run a flat gauge along the full chain length. Any raised or wavy contact point fails.
Misaligned bottom stop causing uneven closure → 🟠 Major . Chain separation under low tensile load → 🔴 Critical .
Fabric Interaction — Don't Ignore the Seam Zone
After any mechanical test, check the fabric and stitching right around the zipper tape . Stress builds up at two points: the bottom stop and any curved seam junction near the hem.
Look for:
Fabric Defect Near Zipper | Classification |
|---|---|
Puckering or bubbling along tape stitch line | 🟠 Major (affects sliding) |
Broken or skipped stitches attaching tape | 🟠 Major |
Tape curling or twisting, measurable by gauge | 🟠 Major |
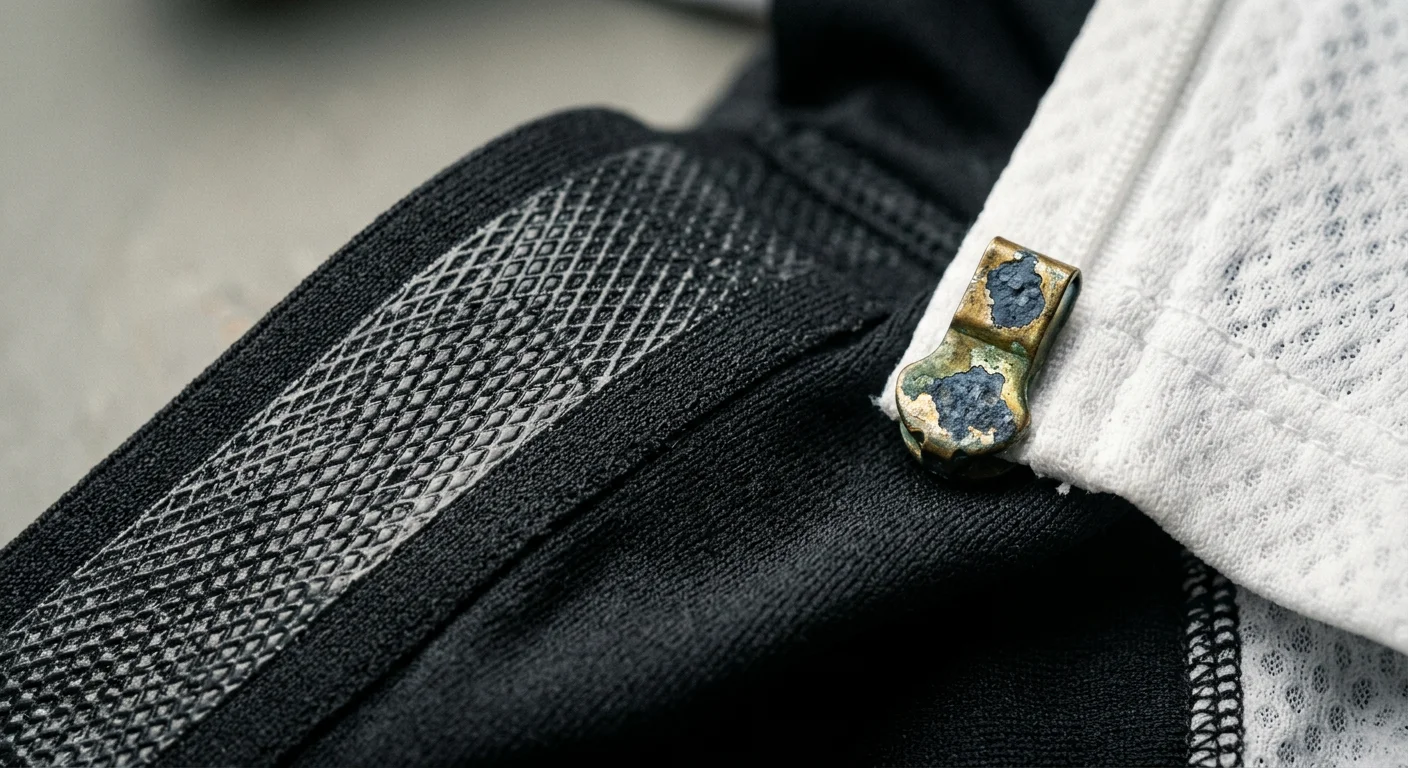
Sharp burr or edge on slider/stop contacting fabric | 🔴 Critical |
Metal corrosion on slider, puller, or stops | 🔴 Critical |
Sharp edges and corrosion are safety-critical — not cosmetic issues. A corroded stop that stains a white jersey panel turns one defect into a refund and a negative review, arriving together in the same package.
Zipper Inspection Summary
Check | Pass Standard | Defect Level |
|---|---|---|
Brand/size match vs. BOM | Exact match (YKK/#3/#5) | 🔴 Critical if substituted |
Sliding force | 3–8 N | 🟠 Major outside range |
Chain tensile strength (#5) | ≥300 N | 🟠 Major |
Stop holding strength (#5) | ≥100 N | 🟠 Major |
Slider pull-off resistance | ≥120 N (#5) | 🟠 Major |
Auto-lock holding | No creep ≤20 N | 🟠 Major |
Cycle durability | 500+ cycles no failure | 🔴 Critical <50 cycles |
Bottom stop alignment | ±1 mm tape flush | 🟠 Major |
Fabric puckering at tape seam | None | 🟠 Major |
Sharp edges or corrosion | Zero | 🔴 Critical |
Silicone Grippers & Anti-Slip Leg Bands
Silicone grippers are the smallest component on a cycling bib short. They're also responsible for a large share of customer complaints — pressure marks, skin irritation, bands that roll down mid-ride, and silicone that peels off after ten washes.
Getting this right comes down to five specific checkpoints.
Material & Construction Verification
Your approved BOM must list the elastic base with full detail. Acceptable construction:
Base elastic : Nylon/Polyester 75–85% + Spandex 15–25%
Finished band width : 25–60 mm depending on size run
Silicone pattern : waves, dots, or stripes — minimum 30–50% surface coverage
Silicone nominal thickness : 0.3–0.5 mm
Solid full-coverage bands create the "sausage leg" effect. Thick ridges leave visible pressure marks after 30 minutes of wear. Pattern-based silicone with controlled coverage fixes both problems at once.
Silicone Adhesion — Cross-Hatch & Tape Peel Test
Standard : ASTM D3359 / ISO 2409 with 3M 600 or 610 tape
Score a 6×6 grid through the silicone layer down to the elastic substrate. Press tape down hard, then pull at 90°. Rate the result against the standard scale.
Result | Classification |
|---|---|
Rating ≥4B (minimal grid loss) | ✅ Pass |
Any silicone lifting >2 mm along cut edges | 🟠 Major |
Full squares detaching | 🟠 Major |
Run this test twice: on as-received bands and after 20 wash cycles at 40–60°C . A band that passes fresh but fails after washing is a Major defect. That's the failure your customer finds first — right before they file a return.
Elastic Recovery & Permanent Set
Method : Stretch the band to 200% of original length (e.g., 10 cm → 30 cm). Hold for 1 minute. Release. Wait 1 minute. Measure the recovered length.
Permanent Set (%) = [(Recovered Length − Original Length) / Original Length] × 100
Result | Classification |
|---|---|
Permanent set ≤4% (≤10.4 cm from 10 cm original) | ✅ Pass |
Set >4% | 🟠 Major |
Edge silicone cracking or delamination at any point | 🟠 Major |
Repeat for 50–100 cycles . The set must stay ≤4% throughout. A band that loses recovery after 30 wash-and-wear cycles bags out at the leg hem. That's the failure behind one-star reviews saying "the shorts rode up all day."
Thickness Uniformity — No Ridges, No Pressure Points
Use a contact gauge or non-contact laser thickness sensor . Measure at:
Every 30–45° around the full leg circumference
At least 3 widthwise points : inner edge, center, outer edge
Result | Classification |
|---|---|
All points within ±0.15 mm of nominal | ✅ Pass |
Any localized deviation >0.3 mm at skin-contact zones | 🟠 Major |
Visible ridge leaving indentation on fit model after 30 min wear | 🟠 Major |
This one criterion drives most comfort complaints. A 0.4 mm localized ridge at the skin-contact transition zone will mark the leg. Your customer will photograph it and post it.
Laser-Cut Hem & Bond Integrity
Premium cycling shorts use laser-cut hems with bonded silicone gripper zones. After cutting, inspect at 10× magnification :
Check | Pass Standard | Defect Level |
|---|---|---|
Raw yarn protrusion at cut edge | Zero visible under 10× | 🟠 Major |
Continuous bond line — any void | No void >1 mm | 🟠 Major |
Unsealed raw edge (continuous length) | <2 mm | 🟠 Major |
Bond separation after 50 stretch cycles | None detectable | 🟠 Major |
Silicone Gripper Summary
Check | Pass Standard | Defect Level |
|---|---|---|
Base material vs. BOM | Exact match | 🔴 Critical if substituted |
Silicone coverage | 30–50% minimum | 🟠 Major |
Nominal thickness | 0.3–0.5 mm, deviation ≤±0.15 mm | 🟠 Major if exceeded |
Cross-hatch adhesion (ASTM D3359) | ≥4B, no lifting >2 mm | 🟠 Major |
Post-wash adhesion (20 cycles) | No peeling or significant loss | 🟠 Major |
Permanent set (200% × 100 cycles) | ≤4% | 🟠 Major |
Hem bond voids | <1 mm | 🟠 Major |
Ridge causing visible pressure mark | Zero | 🟠 Major |
Size Measurement & Tolerance Verification
Size problems are silent killers. A cycling jersey that runs 2 cm wide across the chest doesn't get returned with a note explaining the measurement deviation — it gets a one-star review saying "terrible fit, sizing is way off."
Here's how to catch that before it ships.
The 8-Point Flat-Lay Protocol
Measure every garment in your AQL sample flat. No stretch, no tension. Use a calibrated metal ruler or tape with 0.1 cm minimum resolution. Lay the garment on a flat surface, squared to center lines. Do that before you touch a single measurement point.
For cycling jerseys, measure these 8 points:
Body length : HPS to bottom hem, center front
Chest width : 2.5 cm below armhole, seam-to-seam
Hem width : Bottom edge, side-to-side
Shoulder width : Point to point, straight across back
Across front : 2.5 cm below armhole, side seam to side seam
Neck opening width : Inside edge to inside edge
Sleeve length : HPS/shoulder seam intersection to cuff end
Sleeve opening/cuff width : Straight across cuff opening
For bib shorts and cycling tights, measure these 8 points:
Waist relaxed width : Top edge, elastic not stretched
Waist extended width : Stretched to specified tension
Hip width : 5–8 cm above crotch point, seam to seam
Front rise : Top waistband to crotch seam intersection
Back rise : Top waistband to crotch seam (back)
Thigh width : 2.5 cm below crotch
Knee width : At the specified distance from crotch (35 cm is standard)
Leg opening width : Straight across hem
Tolerance Standards — The Exact Numbers
Lock these into your tech pack before bulk cutting begins. These numbers apply to performance knit cycling apparel using standard factory manual flat-lay:
Dimension | Tolerance |
|---|---|
Body lengths (jersey, front/back rise, outseam) | ±1.0 cm |
Critical widths (chest, waist, hip, thigh, hem) | ±0.5 cm |
Cuffs, sleeve openings, leg openings | ±0.3 cm |
Neck opening, logo placement, pocket position | ±0.5 cm |
Elasticated waist — relaxed | ±0.7–1.0 cm |
Elasticated waist — extended | ±1.0–1.5 cm |
Your measuring tools matter here. A tolerance of ±0.3 cm (3 mm) means your tape or ruler must repeat to ≤0.03–0.05 cm . Standard industrial measurement practice calls for accuracy 4–10× finer than the tolerance limit . Calibrate your tools once a year. Also, check them against a steel gauge before every inspection session.
Pass/Fail Decision Logic
Each measurement point on each garment gets checked against spec:
Within tolerance → ✅ Pass
Outside tolerance but within 1.5× tolerance → 🟡 Minor deviation — record and monitor; acceptable on non-critical dimensions
Outside 1.5× tolerance on a critical fit dimension → 🟠 Major defect
Real-world example: Body length spec is 70.0 cm, tolerance ±1.0 cm.
- 71.2 cm → Minor (over by 0.2 cm, still inside the 1.5× band of ±1.5 cm)
- 72.0 cm → Major — over by 2.0 cm, exceeds 1.5× tolerance, affects fit coverage
Chest or waist deviation >1.5 cm from spec is always a 🟠 Major defect , no matter which size it falls on.
Grading Consistency Check — S Through XL
Individual measurements tell you one piece of the story. Grading errors tell you the whole batch is broken.
Set your nominal grade increments before inspection starts:
Body length : 1.5–2.0 cm per size step
Chest/waist/hip width : 2.5–3.0 cm per size step
Sleeve length : 1.0–1.5 cm per size step
Then run this calculation:
Proportional Scaling Error (%) = |Actual increment − Spec increment| ÷ Spec increment × 100
Reject the batch for that size pair if Error % > 2% on any critical measure.
Practical example: Your spec calls for a 3.0 cm chest grade between M and L. Cycling apparel manufacturer production shows 3.2 cm actual average. That's a 6.7% proportional error — well beyond the 2% threshold. Stop cutting. Pull the graded nest. Investigate before any more units get sewn.
Symmetry Verification
Asymmetry in cycling apparel isn't a minor cosmetic flaw. An off-center bib short creates uneven pressure on the body. A twisted leg opening is visible on the bike. Check these four points on every AQL sample:
Symmetry Check | Method | Pass Standard | Defect Level |
|---|---|---|---|
Left vs. right leg opening | Measure each hem width on its own | Difference ≤0.3 cm | 🔴 Critical if >0.5 cm |
Left vs. right cuff width | Same method | Difference ≤0.3 cm | 🟠 Major |
Side seam lengths left vs. right | HPS to hem both sides | Difference ≤0.5 cm | 🟠 Major |
Hem curve vs. sealed sample | Overlay production piece on PP sample, pin at side seams and CF/CB | Deviation ≤0.3–0.5 cm at any reference point | 🟠 Major |
Defect Severity Classification
🔴 Critical — Reject the unit. Investigate the pattern and marker right away.
- Asymmetric seams causing visible distortion (twisted leg, non-vertical side seam)
- Grade ratio wrong across sizes — increments off by >2% proportional error
- Left/right leg opening difference >0.5 cm, visible asymmetry on wear
- Silhouette mismatch vs. sealed sample that changes the style's fit identity
🟠 Major — May trigger size-level lot rejection
- Chest or waist deviation >1.5 cm from spec on any size
- Body length deviation >1.5 cm causing coverage failure (jersey too short to tuck in riding position)
- Any size overlap — size M chest wider than size L spec minus tolerance
- Systematic drift — all units trending 1.0–1.5 cm above or below spec across the size run
🟡 Minor — Record and monitor
- Deviations within tolerance band or within 1.5× tolerance on non-critical dimensions
- Slight asymmetry ≤0.3 cm not visible when worn
Sampling Protocol for Measurement Checks
Build measurement checks into your AQL pull. Don't run it as a separate step.
At production start : Measure 5 pieces per size (S through XL) across all 8 points
During bulk production : Measure at least 2 pieces per size per 500 units or per cutting lot
Plot measurements on a control chart per size : Your rolling mean hitting 70–80% of the tolerance limit is your signal to adjust the process. Don't wait until units are already out of spec.
A drift where every size runs 1 cm above upper tolerance isn't a measurement problem. It's a shrinkage assumption or pattern scaling error. Catch it at 500 units, not at 3,000.
Size Measurement Summary
Check | Pass Standard | Defect Level |
|---|---|---|
Body length (jersey, rise) | ±1.0 cm | 🟠 Major if >1.5 cm off |
Chest / waist / hip width | ±0.5 cm | 🟠 Major if >1.5 cm off |
Leg opening / cuff width | ±0.3 cm | 🟠 Major if >0.5 cm off |
Leg opening symmetry | ≤0.3 cm L vs. R difference | 🔴 Critical if >0.5 cm |
Grade increment proportional error | ≤2% per size step | 🔴 Critical if systematic |
Hem curve vs. sealed sample | ≤0.5 cm at all reference points | 🟠 Major |
Side seam length symmetry | ≤0.5 cm L vs. R | 🟠 Major |
Appearance, Finish & Trimming Standards
Start every AQL sample with a full surface scan. Use ≥700 lux lighting on each garment before anything else.
Look for four specific defects:
- Oil stains
- Dye spots
- Broken prints
- Loose thread ends longer than 0.3 cm
Spot any of these on a light-color jersey panel? That's a 🟠 Major defect . It shows at point of sale and will drive returns.
For striped or multi-color panels, check pattern matching at side seams and armholes . Keep offset tolerance at ≤3 mm . Go beyond that, and the misalignment shows up to the naked eye on the rack.
Pressing and finishing inspection — three failure points to catch:
- Gloss burn marks on technical fabric surfaces
- Steam water spotting
- Uneven panel tension after finishing
Final trim verification — check all four:
- Reflective strips: aligned per spec
- Laser-cut vents: clean edges, no hanging yarn
- Hang loops: bartacked with a firm, tight tack
- Any missing safety-critical reflective element → 🟠 Major defect , no exceptions
Labels, Compliance & Care Instruction Audit
Labels fail without warning. A wrong fiber percentage, a missing RN number, or an incorrect country of origin won't show up in a visual inspection. It shows up in a customs hold, a retailer chargeback, or a regulatory fine.
Check every label type on every AQL sample unit: main label, care label, size label, hangtag, polybag insert, barcode, and RFID tag.
Five non-negotiable checkpoints:
Fiber content — Label percentages must match your BOM. Every fiber ≥5% needs its own declared percentage. Mismatch = 🔴 Critical
Country of origin — Must align across garment label, hangtag, polybag, and carton. Conflicting COO = 🔴 Critical
RN/CA number — Cross-reference against the FTC registry. Wrong entity or missing = 🔴 Critical
Care symbols — All five ISO 3758 fields must be present and in sequence. Contradictory instructions = 🔴 Critical
Barcode scan rate — ≥98% successful reads across 50 units per SKU. Wrong GTIN encoded = 🔴 Critical
Label legibility after washing matters too. Run labels through 5 wash cycles at the declared care temperature. Symbols must stay at grade ≥4 legibility. Fading below that threshold is a 🟠 Major defect .
Packaging, Carton Strength & Shipping Readiness
A garment can clear every inspection checkpoint and still arrive damaged, moldy, or seized at customs. The reason? Bad packaging.
Lock these down before a single carton leaves the cycling apparel wholesaler floor.
Carton Board Specification
Get the factory's Box Maker's Certificate (BMC) . Check that the ECT rating matches your approved spec:
Load / Condition | Required Board | ECT Rating |
|---|---|---|
Standard apparel, ≤14 kg | Single-wall | ≥32 ECT |
Dense knitwear or ≥5-layer stacking | Single-wall | ≥44 ECT |
Ocean freight, >2.5 m stacking | Double-wall | ≥48–51 ECT |
Wrong board grade delivered vs. approved spec → 🟠 Major defect .
Drop Test (ISTA 1A)
Pull 1–3 cartons per style . Drop from 76 cm onto a rigid surface — 4 corners, 3 edges, 2 faces.
Fail criteria:
- Flap opening or tape failure → 🔴 Critical
- Permanent edge deformation >15–20 mm → 🟠 Major
- Visible garment crushing or moisture breach inside → 🟠 Major
Polybag & Moisture Control
Minimum polybag thickness: 0.03 mm — check with a handheld gauge
Suffocation warning: required on any bag ≥127 mm opening, font ≥8 pt, high-contrast ink
Seal integrity: manual 10 N pull — no opening or delamination >30% of seal length
One style / one color / one size per retail polybag — mixed contents = 🟠 Major
For sea freight routes, check the silica gel count per carton :
- Moderate humidity, ≤30-day transit: 10–20 g per carton
- Monsoon season / 30–45+ day transit: 20–50 g per carton
No desiccant in a moisture-sensitive shipment → 🟠 Major .
Carton Marking & Weight Verification
Each carton must show: PO number, style/color/size breakdown, carton sequence number, GW/NW, country of origin, and consignee. Any field that doesn't match the packing list or commercial invoice → 🟠 Major .
Weigh ≥5 cartons or 5% of the lot — go with whichever number is higher. The acceptable variance is ±5% of documented weight . More than 2 cartons outside that band triggers a full lot investigation.
Conclusion
Skip the QC gate on a bulk order, and you're taking a real risk. In cycling apparel, that risk hits hard. A bad chamois pad, a sublimation print that bleeds after one wash, a seam that bursts after delivery — these don't just cost you money. They wipe out customer trust. They eat your refund margin. Sometimes they take your entire season's revenue in a single shipment.
The 12-module cycling apparel quality control checklist you just went through isn't theory. It's the exact inspection framework that separates brands that grow from brands that take a loss.
Your next step is simple:
Download the printable PDF checklist
Send it to your cycling apparel manufacturer QC team or third-party inspector before they open a single carton
Make it a required part of every bulk order agreement going forward
The brands winning in cycling apparel right now aren't just building better kits. They're inspecting smarter.
Don't ship blind. Ship with proof.