Three weeks before your charity ride, you realize the custom cycling jerseys still aren't ordered — and 200 cyclists are counting on you. That stomach-drop feeling? You're in the right place.
Running a team cycling apparel program for charity events is harder than it looks. First-time organizers often walk straight into it: sizing chaos, sponsor logo approvals, minimum order headaches, and a production deadline that won't budge. These problems are easy to miss until they hit you all at once.
This guide gives you a clear, week-by-week plan — starting 16 weeks out. You'll know exactly what to do and when to do it. Your charity bike ride merchandise arrives on time, stays on budget, and looks sharp enough to make every sponsor proud and every cyclist excited to pin on their number.
Weeks 16–14: Define Participant Scope, Budget Caps & Fundraising Tier Structure

Every apparel disaster traces back to one root cause: someone skipped this step.
Before you touch a design file, contact a vendor, or send a single registration link, lock down three numbers in writing — your headcount tier , your per-athlete budget cap , and your fundraising tier structure . These three decisions drive everything that follows.
Lock Your Headcount Tier First
Don't plan to exact numbers. Plan to bands. Use three realistic participant brackets — 50, 200, or 500+ riders — and commit to one before anything else moves.
Your kit quantities, staffing load, sponsor obligations, and ordering minimums all hinge on this single anchor.
Miss by even one tier and your event ends up chasing a second production run at twice the unit cost. That's an expensive mistake to fix mid-campaign.
Set the Per-Athlete Budget Cap
Once you know your headcount band, price the kit ceiling — not the floor.
Here's where cycling apparel pricing lands for nonprofit events:
$35–$50/piece — baseline OEM cycling club apparel fit, sublimation printing, functional but straightforward
$60–$90/piece — mid-tier branded kit with a tighter cut and premium finish
Bib shorts run 1.2–1.8× the jersey cost — build that into your numbers from the start
A full kit cap of $100–$180 per rider is your working benchmark. Set that ceiling first. Then structure your fundraising ask around it — not the other way around.
Build the Fundraising Tier Structure
Work backward from your campaign goal using a gift range chart . Here's the planning math that holds up in practice:
80% of funds come from 20% of donors — put your energy into the top tiers first
Each tier level should sit at half the amount of the tier above it
Double or triple the donor count at each lower tier to keep totals balanced
Plan for a 3:1 prospect-to-gift ratio overall, and 4:1 for your top-tier asks
A clean kit incentive structure looks like this:
Tier | Apparel Benefit |
|---|---|
Premium donor threshold | Free full kit , fully underwritten |
Standard registrant | Paid pre-order at subsidized price |
Sponsor co-pay | Covers 30%–100% of bulk apparel cost depending on logo exposure |
The Approval Gate You Cannot Skip
Close out week 14 with every item below documented and signed off:
✅ Total apparel budget confirmed
✅ Target delivery date set
✅ Headcount tier selected
✅ Fundraising distribution model approved
✅ Staff and volunteer apparel flagged as a separate production run (if needed)
✅ Route distance, elevation, and seasonal weather checked — use this to finalize your kit mix: short sleeve, long sleeve, windproof gilet, or base layer
This approval gate is your internal lock point. Nothing moves to vendor outreach until every line is checked.
Weeks 13–11: Screen Manufacturers Using MOQ, Turnaround Time & Sublimation Specs
The wrong vendor won't just slow you down. They'll unravel everything you locked in during weeks 16–14.
This is where first-time charity ride organizers lose the most ground. Not because they can't find suppliers. Because they don't know which questions separate a reliable custom cycling jersey partner from one that sounds great until week four.
Here's how to evaluate fast, cut the noise, and move forward.
Know the Three Supplier Types Before You Reach Out
Not all vendors work the same way. The differences hit your budget and timeline hard.
US event-focused platforms are built for charity rides and club kits. You get MOQs of 5–10 pieces per style , jersey retail pricing at $60+ , and a hosted team store where each rider picks their size and pays on their own. Lead time runs 4–6 weeks from store close to delivery. The fundraising rebate model returns 10–20% of net sales to your nonprofit . That makes these platforms a strong fit for charity events.
Zero-minimum custom houses take orders with no MOQ floor. They work well for pilot rides with 10–40 riders . You do pay for that flexibility — jerseys run $80–$110 per unit. Most of these vendors provide free design layout support and carry tested fits: race, club, and women-specific, all developed in-house.
Direct OEM/ODM cycling apparel factories (like Ninghow) offer the lowest per-unit pricing — $18–$30 per jersey at 100+ pieces . They do require a 30–50% deposit upfront and you'll communicate via email or WhatsApp rather than a polished storefront. Price breaks land at 25 / 50 / 100 / 300 pieces per SKU .
The Five Specs That Predict Quality
A vendor clears your MOQ and cycling kit turnaround time threshold? Good. Now dig into these:
Fabric weight : 135–150 gsm for race jerseys; 160–180 gsm for club cut
Sublimation wash fastness : Ask for lab reports showing ISO 105 grade 4–5 on polyester
Color accuracy : Confirm ΔE tolerance ≤ 2–3 and get Pantone strike-off samples before the mass run
Chamois grade : Italian CyTech or Elastic Interface pads in the 90–120 kg/m³ density range — not generic PU foam
Production commitment : Get written confirmation of ≤6 weeks door-to-door after art approval
Each of these specs filters out vendors who look good on paper but fall apart mid-production.
Your Week 11 Screening Checklist
Close this phase with every shortlisted vendor cleared on these points:
✅ MOQ tier confirmed (0 / 5 / 10 / 25+) with exact price breaks in writing
✅ Written turnaround commitment: 7–15 business days production plus shipping window
✅ Sublimation fabric specs and sample photos in hand
✅ Chamois type confirmed — branded Italian pad or equivalent
✅ Payment terms clear: deposit structure, accepted methods, refund policy
✅ Team store or size spreadsheet capability verified for bulk cycling apparel management
Three vendors on your shortlist. Five specs confirmed. That's the one output that matters as you leave week 11.
Weeks 10–8: Map Sponsor Logo Placement Hierarchies & Secure Design Compliance
Sponsor logo chaos is the silent budget killer nobody warns you about. One misplaced mark, one unapproved trademark, and you're reprinting 200 jerseys three weeks before race day.
This phase turns your sponsorship agreements from PDFs into actual pixels on actual fabric. Get the hierarchy wrong and you'll spend weeks 7–5 stuck between a title sponsor furious their logo is the same size as a silver-tier coffee shop — and a vendor asking why the artwork changed again.
Map the placement architecture before anyone touches the design file.
Build Your Tiered Placement Map First
Think of your jersey as real estate. Location determines rent.
Title / Presenting sponsor : Center chest, upper back yoke, bilateral sleeves, collar trim. These are your highest-exposure zones. Everything else yields to them.
Gold tier : Center back panel, one sleeve, or side torso panels. Prominent, but secondary to the presenting sponsor — that gap in size needs to show.
Silver / Support tier : Lower back hem, lower panels, bib lower band. Small, well-spaced, and never competing with the anchors above.
Size hierarchy enforces the pecking order. Keep sponsor marks at 1–4 inches wide . Reserve 4–6 inches for your primary event or nonprofit logo. Upper back marks can push 6–10 inches — that's your high-impact anchor zone.
Riders bent over the bars make low-back placements fold and disappear. Upper chest, upper back, and sleeve tops stay readable through the entire ride. Put your most important sponsors where visibility holds up across the whole peloton.
Set Your Asset Submission Standards in Writing
Send every sponsor a one-page asset brief before they send you anything. Be specific about what you need:
Vector files only :
.AI,.EPS, or transparent.SVG— no JPEGs, no screenshots from a websiteColor specs : Pantone or CMYK values, limited to 2–4 colors per logo to prevent sublimation registration problems
300 DPI raster backup alongside the vector, as a production fallback
Minimum clear space : at least 1 inch gap between any two adjacent logos — no exceptions
Restricted zones : keep all artwork clear of seams, armpits, and trim edges
Don't assume sponsors have production-ready files. Many don't. Chase those assets in week 10, not week 6.
Lock Approvals Before Production Opens
Build your design on the cycling apparel supplier's own 2D or 3D flat templates — never a generic mockup. Panel geometry and seam placement vary by manufacturer. A logo that looks clean on a generic template can land right on a side seam in real life.
Run internal review first. Share the proof with your development team, communications lead, and brand manager before anything goes external. Catch hierarchy and naming issues in-house before they become external problems.
Then route to each sponsor's compliance officer — not just your day-to-day contact. Trademark usage often needs a separate sign-off. Finding that out in week 3 costs you real money.
Archive every approval in writing. An email confirmation or a marked-up proof PDF works fine. That one habit cuts out late-stage redesign fees and protects you if a sponsor disputes what they signed off on.
Your week 8 gate: every logo placed, every asset submitted in spec, every approval documented. The design file doesn't move to production without that paper trail in hand.
Weeks 7–6: Deploy Digital Sizing Collection Tools & Consolidate Group Orders
Sizing chaos doesn't announce itself. It creeps in — through reply-all email threads, a captain texting "wait, which chart do we use?", and a spreadsheet with three different columns all labeled "size." You have two weeks to stop that from happening. Use them with purpose.
Build a Form That Captures Real Fit Data
A generic "what size are you?" dropdown is not a sizing form. It's a guess box. Replace it with a structured intake form built on the fields that matter.
Every submission needs to capture two categories: body metrics and fit history .
For body metrics, collect height, weight, chest, waist, hip, and inseam. Keep all fields numeric. Add unit selectors (cm/in or kg/lb) for each one. These aren't optional extras. Tools like True Fit and 3DLOOK rely on height and weight as their core prediction inputs. Mirror that same logic in your form.
For fit history, add:
Preferred fit style : Race/Slim, Club/Regular, or Relaxed/Comfort — radio button, required
Usual jersey size in known brands : Castelli, Rapha, or Assos — one dropdown per brand they wear
How tight do they prefer their cycling tops : a 1–5 scale, from painted-on to very loose
Build the form in Google Forms or SurveyMonkey . Turn on mandatory validation for every numeric field. Reject heights outside 120–220 cm and weights outside 40–130 kg. Pre-fill the team or event ID in the URL. That way, responses auto-map to the right group — no manual sorting needed.
Embed the Vendor's Size Chart Inside the Form
Don't link to the chart. Don't attach it as a PDF. Put it right inside the form.
Add a section labeled: Step 1: Measure. Step 2: Match to Chart. Step 3: Submit your size.
Insert the vendor's full measurement table — chest, waist, hips, inseam — with matching sizes for jersey, bib, and jacket. Then make this question required: "According to the chart above, my measured chest places me in size: XS / S / M / L / XL / XXL."
Swap every free-text size field for a dropdown labeled: "Race Jersey Size (per chart above — not what you normally buy)." Add a required final checkbox: "I have measured myself and cross-checked with the vendor chart. I understand this may differ from my regular clothing size."
That checkbox alone slashes your late-stage size dispute rate. It's one small step that saves hours of back-and-forth later.
Run Three Intake Channels at Once
Launch Day (start of Week 7):
Send a mass email to every registered rider. Include a unique form link, a hard 7-day deadline, and a note that their confirmation email serves as their size receipt.
Embed the form as a required post-registration step on your event sign-up page.
Set up automated reminders for anyone who registered but hasn't submitted sizing yet.
Physical try-on clinic (mid-Week 7):
Ask your vendor for a sample size run — jerseys XS through 3XL in both men's and women's cuts, bib shorts across the same range, plus core outerwear sizes. Most cycling apparel suppliers offer this for team orders. It cuts down on returns for them too, so it's an easy ask.
At the clinic, set up a laptop running the same digital form. As riders try things on, log their best-fit sample size and any notes: "M jersey, prefers race-tight — order S." Push each rider to try at least two sizes in both jersey and jacket. Outerwear is where mis-sizing piles up most.
Team captain aggregation:
Give each captain a team-specific form link with a hidden captain code. Send them a downloadable roster template in Excel or Google Sheets for offline collection. Set a clear target: ≥90% team submission by Day 5 . Captains who hit 100% by Day 5 get priority access to any limited-edition pieces. It's a small reward — but it gets results.
Lock Orders and Plan Your Buffer
Hard cutoff: 7 days after form launch. Put that deadline at the top and bottom of every form page and in every email subject line. Once the deadline passes, disable new responses. Route late submissions to a wait-list form that carries no fulfillment guarantee.
For overage planning, use an 8–10% buffer on core sizes — M, L, and sometimes S and XL, where demand clusters. For fringe sizes like XS or 3XL, cap the buffer at +0–5% .
A practical example: 60 submitted M jerseys → order 65–66 units.
Track change requests with a firm hand. Accept resubmissions before the cutoff only. After that, exchanges come from buffer stock on a first-come, first-served basis. Your target: ≤5% exchange rate across the full order.
By the end of Week 6, you need one clean master sizing sheet, a finalized purchase order with overage built in, and zero open questions on quantities. That's your gate to production.
Weeks 5–4: Lock Bulk Pricing Tiers, Approve Pre-Production Samples & Execute Contracts

The difference between a $68 jersey and a $78 jersey comes down to one conversation. You either had it before signing — or you didn't.
These two weeks are your financial lock point. Pricing decisions, physical samples, contract clauses — everything lands here. Nail this phase and you walk into production with clean numbers, approved artwork, and a cycling apparel supplier who knows what you expect. Skip it and you're negotiating from weakness at the worst possible moment.
Lock Your Bulk Pricing Tiers in Writing
Most factories use an all-units tiered structure . Hit a threshold and every unit in the order prices at that tier. Find out where the breaks land before you sign anything:
Order Quantity | Per Jersey Price |
|---|---|
50–99 units | $78 |
100–249 units | $68 |
250–499 units | $59 |
500+ units | $53 |
The gap between 80 and 100 units is worth $800–$1,200 in savings on a typical charity ride order . Use your pre-order window to push past the threshold on purpose.
How to use pre-orders to move tiers:
Open a 30-day pre-order window before your cycling apparel factory cutoff. Put the tier table right on the order page — something like: "If we reach 100 jerseys, every rider gets a $10 store credit." Collect full payment upfront. Route it into a dedicated project account. Use that committed cash to anchor your factory deposit.
Your nonprofit's gross per piece should land at $25–$30 after you subtract factory cost, packaging, freight, and payment fees. Before signing, check that every tier still clears your minimum 35–40% gross margin target . If it doesn't, renegotiate the tier structure — not your rider pricing.
Contract language that protects you:
Insert this clause word for word, or close to it:
"Unit price for sizes XS–XL: $78 at 50–99 units; $68 at 100–249 units; $59 at 250+ units, ex-works [city]. Final invoicing will use the best achieved tier based on total bulk order quantity at PO close. If final paid pre-orders exceed the next pricing tier threshold by ≥10%, supplier agrees to use the higher tier pricing for the entire batch."
Also add a price integrity clause: "Unit prices and tier discounts are fixed and not subject to surcharge once the deposit is received." Fuel costs, currency swings, and rush-fee creep are real. This clause makes those the supplier's problem — not yours.
Validate Your Pre-Production Samples Before Anything Ships
No deposit leaves your account until physical PP samples are in your hands — full stop. Add this clause to your contract: "Production cannot start until written approval of PP sample."
Request fitted mockups on three body profiles:
Profile A : Short torso, heavier build — 5'6", 175 lb
Profile B : Average build — 5'10", 160 lb
Profile C : Tall and lean — 6'2", 175 lb
Fit deviations are deal-breakers at this stage. They are not starting points for a conversation. Hold to these measurable tolerances:
Jersey length deviation from spec: max ±1.0 cm
Chest and waist circumference: max ±1.5 cm
Sleeve opening stretch: measured against pattern spec at a specified load
Run four functional tests on every PP sample:
Seam tension — Stretch shoulder, crotch, and side seams to 120–130% of relaxed length. No popping, no skipped stitches, no broken thread.
Zipper glide — Run 20–30 full open-close cycles under moderate tension. No jamming, no tooth separation.
Chamois compression — Have riders test on at least two rides of 2+ hours. Rate comfort on a 1–5 scale. Note any hot spots.
Colorfastness — Wash at 40°C for 3–5 cycles. Allow no more than 1 grade change on the grey scale for color or bleeding. Check all Pantone references under a D65 light box.
Label one approved sample set "APPROVED PP — DO NOT USE" and require the factory to keep it on-site as the production reference. Keep the second set yourself. If anything deviates on a critical item — fit, print, pad — ask for a revised PP sample. Do not give conditional approval.
Execute Contracts With Quantified Milestones
PP samples approved? Your contract timeline starts at T0 — the moment the deposit lands. Every milestone needs a hard date attached:
Milestone | Target |
|---|---|
T0 | Contract + 30% deposit received |
T0 + 7 days | Bulk fabric and trims in-house |
T0 + 14 days | Cutting complete |
T0 + 21 days | Sewing 50% complete |
T0 + 28–30 days | Packing complete, goods ready to ship |
For delays past a 5 calendar day grace period : negotiate a 1–2% price reduction per full week of delay, capped at 10%, or an air-freight upgrade at the supplier's cost. Add "time is of the essence" language — event-dated apparel has no room for delays.
Set your defect tolerance in writing:
Critical defects (wrong size label, major print error): 0%
Major defects (open stitching, zipper failure, print misalignment >5 mm): ≤2%
Minor defects (loose threads, slight fabric skew): ≤4%
If defects go past those thresholds, your contract should give you two options: a free remake of affected units delivered within a set window, or a pro-rata refund of unit cost plus any duties on scrapped pieces.
Before you wire the deposit, confirm every item below:
✅ PP sample approved in writing with a signed form
✅ Final vector artwork files locked, filename and date noted in the contract
✅ Proforma invoice shows correct tier prices, quantity per size and SKU, and agreed payment terms
✅ Incoterms confirmed (FOB, CIF, or DDP) and freight booking responsibility assigned
✅ Ship-to address, contact name, and receiving hours documented — including any carton split for multi-hub delivery
The deposit wire is the trigger. Production starts the moment it goes through, and the clock runs from there. Check every line above before that transfer moves.
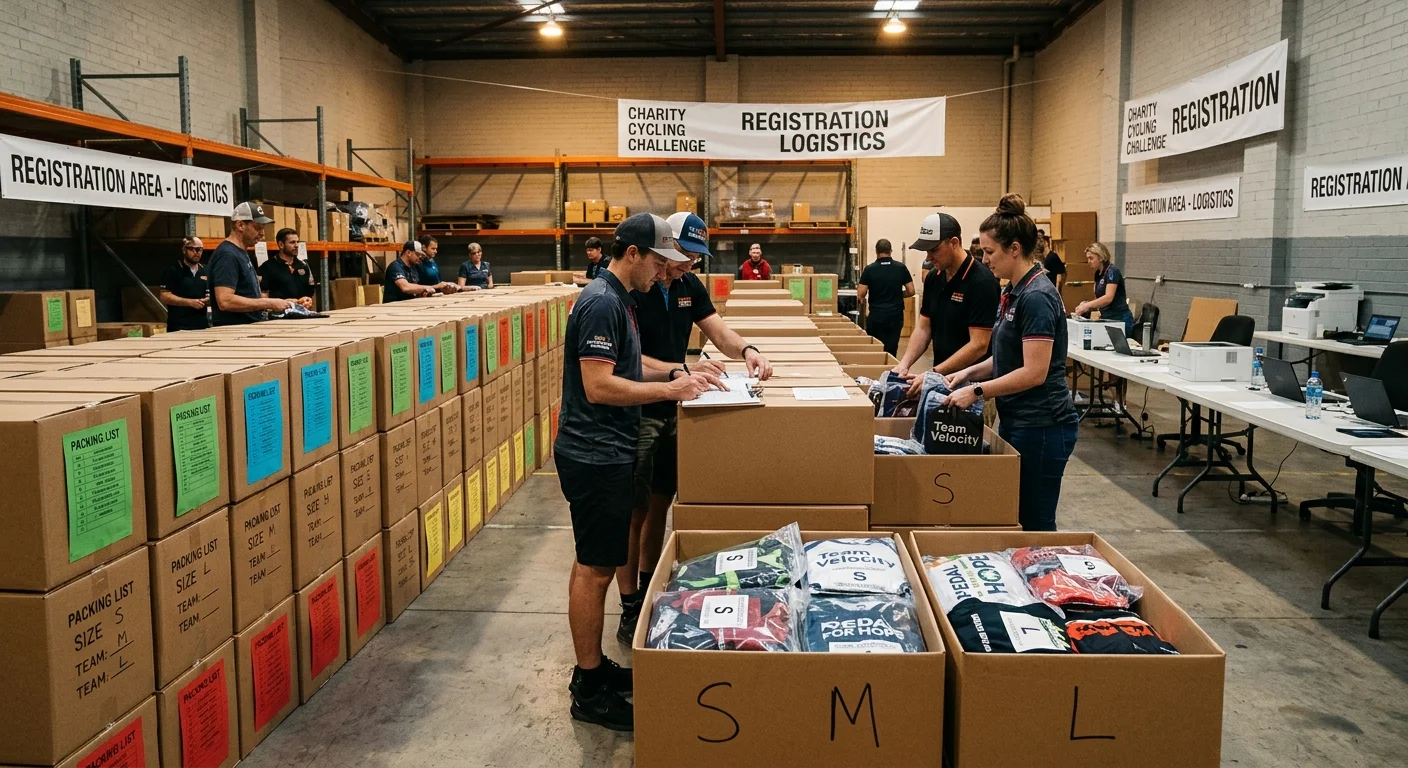
Weeks 3–2: Monitor Production Batches, Run Quality Checks & Map Logistics Routing
Production is running. The deposit cleared. Now comes the part nobody tells you about — the long, quiet stretch where everything either holds together or falls apart.
These two weeks are not passive. This is the most operation-heavy phase of your entire cycling apparel minimum order quantity process. Organizers who treat it as a waiting period are the ones who open cartons at the registration desk and find jerseys labeled wrong, logos misaligned, or sizes swapped between teams.
Here's how to stay in front of it.
Set a Factory Monitoring Cadence — and Hold It
Ask for photo and video evidence at every major production stage. Minimum once per week. For each update, you need:
Cutting stage : 3–5 photos showing fabric lay-up, marker placement, and cut panels with visible size tags
Sublimation printing : close-ups of 3–5 panels pulled at random per design, compared against your approved Pantone strike-offs
Sewing and assembly : line photos of WIP piles sorted by size and team, plus close-ups of at least 5 finished pieces per size run
Every photo set must carry a time stamp and your PO ID — a handwritten board works fine. No timestamp means no accountability.
Assign a PO trace code to every batch. Use a structure like: CBR24–VN01–B007–S-XL–2604 (event code + factory code + batch number + size band + production date). Print that code on the care label, the polybag sticker, and the carton barcode. At scale, something always goes wrong. This code tells you which batch, which team, and which production run to pull.
Segment your order by team groups of 100–300 sets per batch. A defect that surfaces in one batch stays contained. You re-work 150 jerseys instead of 600.
Track production each day using a simple planned-versus-actual sheet: pieces cut, printed, sewn, and packed against your milestone dates. Any operation that falls more than 10% behind plan for two consecutive days is your escalation trigger. Push for overtime, line rebalancing, or both.
Run Quality Checks by Stage, Not Just at the End
Waiting for a final inspection is a trap. By the time goods are 100% packed, you have almost no leverage. Run in-process QC (IPQC) at each stage instead, using these tolerances:
Cutting:
- Size ratio must match your PO within ±1 size per 50 pieces
- No mixing of different dye lots within a single team's set — shade variation is visible on a peloton
Sublimation printing:
- Color accuracy: ΔE ≤ 2–3 against your approved strike-off
- Logo placement: misalignment no more than ±3 mm in either direction
- Zero tolerance for ghosting, pinholes, or banding on large color blocks — these are the marks that make charity ride sponsor logos on jerseys look unprofessional
Sewing and assembly:
- Left-right logo symmetry on chest, sleeves, and side panels: within ±3 mm
- Pocket stitching: no skipped stitches, backtack at openings 8–12 mm, stress-tested to 10 pulls at 2–3 kg force
- Elastic gripper bands: circumference within ±1.5 cm of spec; silicone application must be continuous with no gaps over 5 mm
- Zippers: smooth operation across 10 full cycles, no waviness greater than 5 mm along the zip length
Measurements:
- Pull at least 3 pieces per size, measure all major points (chest width, body length, inseam)
- Tops: ±1.0 cm tolerance; bottoms: ±1.5 cm
Labels:
- Neck and care label must match your tech pack, packing list, and polybag sticker — no exceptions
- Country of origin and fiber content must meet your target market's labeling rules
For your pre-shipment final random inspection , sample 10% of each shipment lot once packing hits 80% completion. On the first 30–50 pieces per design, inspect 100% for logo placement and sponsor brand accuracy. Drop back to 10% only after that opening batch proves stable.
Critical defects above 0%, or major defects above 2.5%? Block the shipment. Don't accept rework promises without a re-inspection.
Package for Distribution Channels, Not Just for Size
Unit-level packaging is where your cycling kit turnaround time investment either pays off or disappears into chaos at the registration desk.
Pack each rider's complete kit — jersey, bib, and any accessories — into an individual polybag (minimum 50–60 microns). The polybag label must show:
Rider name
Rider ID or bib number
Size code per item (JERSEY M / BIB L)
Team name or charity group
PO trace code
Pack cartons by distribution channel , not by size alone. Label each carton with a channel code — REG (registration desk), CAPT (team captain pickup), or DM (direct mail). Inside each carton, note the size range and the team or rider group it covers.
A practical setup:
- REG cartons : 50–100 riders per carton, sorted by name within
- CAPT cartons : one carton per team, showing team name and exact rider count
- DM cartons : grouped by destination region to simplify 3PL intake
Keep three separate master packing lists — one per channel — with carton IDs that match the physical labels. Your mismatch target is zero errors per 200 cartons. More than one mismatch? Demand a full labeling recheck before anything leaves the warehouse.
Route Freight Based on Your Real Delivery Window
Two to three weeks out from event day, your fundraising cycling event planning timeline has almost no room left for surprises. Map your shipping routes against real transit benchmarks:
Air express (Asia → US or EU) : 3–6 days door-to-door, excluding customs delays
Sea + inland truck (Asia → US West Coast) : 18–25 days port-to-port, plus 3–7 days inland each side
Customs clearance buffer : add 3–5 calendar days to any carrier's quoted transit time — document checks, random inspections, and HS code queries are real and unpredictable
Production slips by more than 3–4 days and your event is within three weeks? Route core sizes (S through XL) by air. Let fringe sizes follow by sea. That split keeps your main volume moving without burning your entire freight budget.
Hold back 10–15% of your apparel budget as a routing contingency. Use it for air-freighting re-made units, last-minute direct-to-rider shipments for late registrations, or local courier legs from your receiving hub to the event venue.
To compare routing options, calculate cost per kit:
(Freight + clearance fees + last-mile delivery) ÷ total number of kits
Run each routing scenario against your delivery NLT date — 3–5 days before the event. Pick the mix that hits that date while keeping total freight spend within 5–15% of merchandise revenue , based on your margin structure.
By the end of Week 2, every carton should be packed, labeled, in transit, and tracked. Your master packing lists should be final across all three distribution channels. Your registration team should have the routing plan in hand — so riders show up on event day and their kit is right where it needs to be.
Event Week: Execute Kit Distribution, Manage On-Site Fittings & Fulfill Fundraising Incentives
The cartons are labeled. The packing lists are clean. Now comes the part that proves every decision you made over the past 16 weeks — or reveals every shortcut you took.
Lock Your Roster and Stage Kits 48–72 Hours Out
Before a single rider shows up, freeze your final roster. Export it to a CSV, tag every record with jersey size, cut (men's/women's), team, and fundraising tier. Generate a unique QR code for each rider — printable on their confirmation email or mobile wallet pass — tied to that record in your check-in app.
Then pre-stage your apparel. Two approaches work:
Alphabetically by last name (A–D, E–H, etc.) for events under 2,000 riders
By team or squad for rides where groups pick up together
Within each section, group by size. Label every kit bag with name, bib number, size, tier, and team — large enough to read at a glance. Include the unique code for scanning at handout.
Pre-staging this way cuts average pickup time to under 90 seconds per rider. Offer an early pickup window one or two days before the ride. Expect 55–75% of riders to take it. That clears your registration-morning bottleneck before it forms.
Separate Check-In from Kit Handout
Run two distinct stations. Never combine them.
Station 1 : Scan QR code, verify identity, confirm fundraising total, assign bib. Target: one station per 150–250 riders per peak hour.
Station 2 : Staff pull from alpha or team shelving, scan the kit bag to log pickup, hand over the kit. Total time from first scan to kit in hand: 1–1.5 minutes .
QR-based check-in cuts errors to under 2% and boosts line throughput by 25–40% over manual name lookup. That gap matters at 7:00 a.m. with 400 riders queuing.
Run a Dedicated Fitting and Exchange Desk
Keep exchanges away from your main registration flow. Set up a Fitting & Exchange Desk with:
2–3 staffed stations per 500 riders
Sample jerseys in every size, labeled "Fitting Samples – Not for Keeps" — these are not inventory units
A visible live inventory board (whiteboard or tablet) showing remaining exchange stock by size to stop over-issuing
Your exchange buffer should be 8–10% on core sizes M–XL , and 2–3% on XS and XXL . Hold to one exchange per rider. Same garment type, clean with tags attached, returned within 24 hours or before start time. No exchanges on name-printed or limited-edition pieces. The only exception is a documented cycling apparel manufacturer defect.
Verify Fundraising Tiers at the Scan Point
Your check-in system should show each rider's confirmed donation total and tier status the moment their QR code is scanned. Staff read it out loud and check off each incentive item as it's handed over.
A clean incentive ladder runs across 3–5 tiers :
Fundraising Level | Incentive |
|---|---|
$250–$500 | Event cap or T-shirt |
$1,000–$1,500 | Standard club-fit event jersey |
$2,500–$5,000 | Premium or limited-edition jersey, bib shorts, or gilet |
$10,000+ | Custom full kit, VIP experience, or lifetime entry |
Some riders cross a tier threshold on the day itself through late donations. Issue a handwritten Tier Upgrade Voucher redeemable at the incentives desk once payment clears. Keep your incentives desk separate from check-in. For events with more than 300 eligible riders, assign at least two dedicated staff with database access.
Send automated thank-you emails the moment each tier is confirmed. Include a digital certificate with the rider's name, total raised, and tier level. Add a forward-looking line: "You raised $2,100 — just $400 from our Champion tier next year." That one line plants the seed for your next campaign before this one is even finished.
Close the Loop After the Ride
Reconcile inventory within 48 hours. Compare ordered vs. received vs. distributed vs. remaining by SKU and size. Target shrinkage below 1–2% . Record every exchange by size — that data sharpens next year's ordering curve.
Log your supplier's performance: on-time delivery rate, defect rate (acceptable threshold: under 2%), and responsiveness throughout production. Archive it in a vendor scorecard. Next time you run this event, that file is the first thing you open.
Conclusion
custom cycling apparel for a charity ride doesn't require event planning experience. You just need to start with enough lead time, ask the right questions, and treat every deadline on your 16-week timeline as fixed.
Organizations that get this right aren't doing anything special. They lock in a supplier before design work starts. They collect sizing data with a real system, not a chaotic spreadsheet. They build sponsor logo requirements into the design brief from day one — not as a last-minute addition at week three.
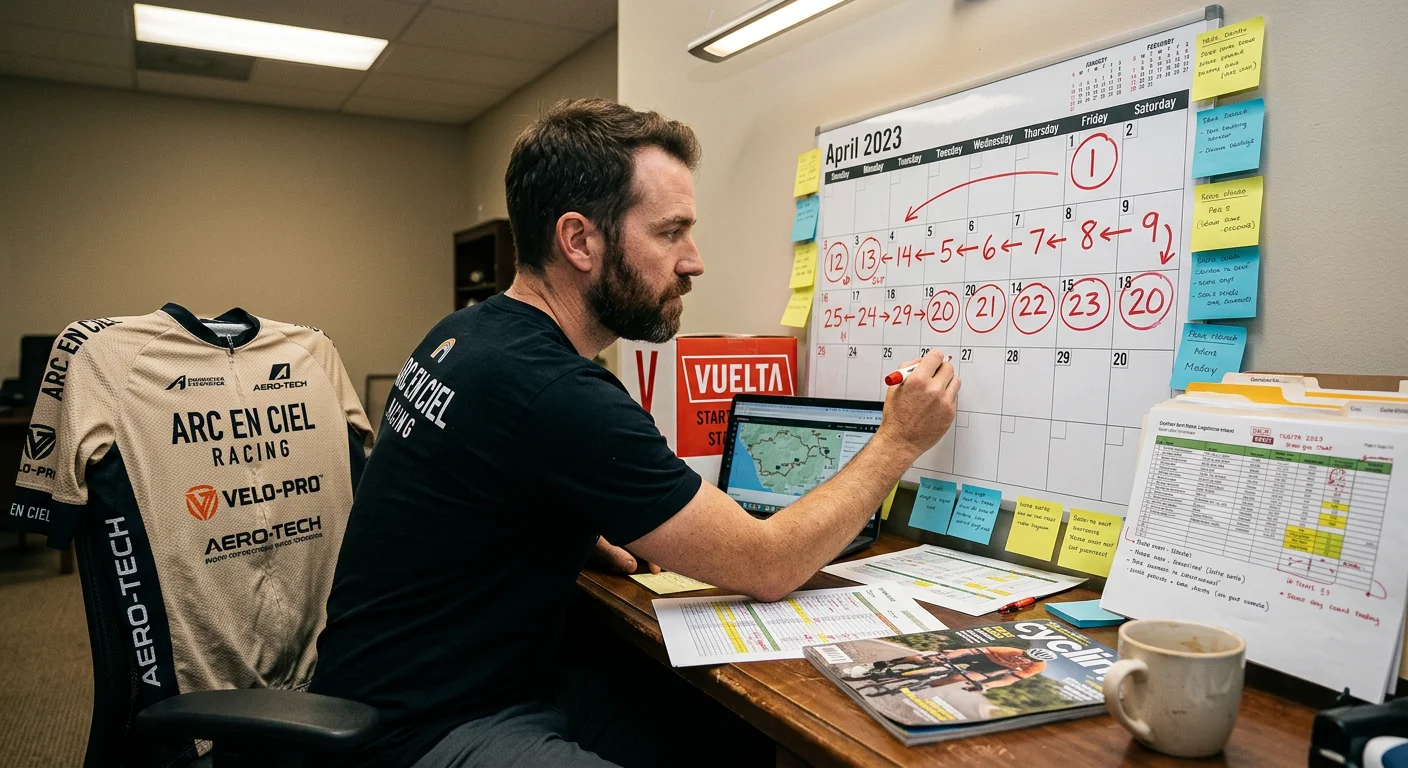
Your next step is straightforward:
Print this guide
Mark your event date on a calendar
Count back 16 weeks — that's your start date
Already past that point? Find which phase you're in right now and move forward from there.
Every rider who crosses the finish line in a custom cycling jersey your team created tells your fundraising story without saying a word. That visibility is worth every hour of planning you put in.